The pathways that help you communicate with others are computer networks, they are an essential part of our daily online communications
The methods and procedures taken to secure a network from unauthorized users\access
When so much of our information is online, whether personal, social, banking, medical, etc., privacy and security matter. The demand and importance of safeguarding our information is crucial
A protocol in networking is a set of rules that specify how data is formatted, sent, or delivered
A conceptual model consisting of seven layers that concludes how applications communicate over a network. It outlines the steps required to transfer data using a physical medium from a source to a destination on a network-connected device. It was created based on recommendations from ISO in the 1980s.
Layer 7     Application      Firefox, Chrome              Host Layer
Layer 6     Presentation     ASCII, JPEG, GZIP            Host Layer
Layer 5     Session          HTTP, HTTPS, FTP, SMTP       Host Layer
Layer 4     Transport        TCP, UDP                     Host Layer
Layer 3     Network          IPv4, IPv6, IPSec            Media Layer
Layer 2     Data Link        PPP, IEEE, L2TP, Ethernet    Media Layer
Layer 1     Physical         Cables, Wireless             Media Layer
Layer 7     Application     HTTP          the client uses a web browser to send http data
Layer 6     Presentation    GZIP          handles the data format and compresses it (If applicable)
Layer 5     Session         Socket        opens a session for communication between source and destination (Web Server)
Layer 4     Transport       TCP           data is segmented, and each segment will have the source and destination port number
Layer 3     Network         IPv4          converts segments into packets; each packet will have the source and destination IP address
Layer 2     Data Link       Ethernet      converts packets into frames; each frame will have the source and destination MAC address
Layer 1     Physical        Coax          converts frames into bit-stream and send the data over the physical medium
Layer 1     Physical        Coax          converts bit-stream into frames
Layer 2     Data Link       Ethernet      merges all frames into packets
Layer 3     Network         IPv4          converts packets into segments
Layer 4     Transport       TCP           converts segments into data
Layer 5     Session         Socket        data is kept
Layer 6     Presentation    GZIP          decompresses data and reverts the formatting
Layer 7     Application     http          the destination receives the client http data
Python has a built-in package called http.server that can be used as file server or a customized web server that handles HTTP(s) requests.
In the terminal, go to the directory that has the static content (files, images, etc..) and type python3 -m http.server, this serves the directory content to clients (Some threat actors utilize this method when they breach a network, Python is most likely running on the devices, so it's used to move data in the breached network). After running the http.server it will show if it was successful or not, and the port that's used
pc@mac~% python3 -m http.server
Serving HTTP on :: port 8000 (http://[::]:8000/)
You can either use a web browser or client to communicate with that server, the content URL in this case is http://127.0.0.1:8000
pc@mac~%curl http://127.0.0.1:8000
<!DOCTYPE HTML PUBLIC "-//W3C//DTD HTML 4.01//EN" "http://www.w3.org/TR/html4/strict.dtd">
<html>
<head>
<meta http-equiv="Content-Type" content="text/html; charset=utf-8">
<title>Directory listing for /</title>
</head>
<body>
<h1>Directory listing for /</h1>
<hr>
<ul>
<li><a href=".bash_history">.bash_history</a></li>
The course content is built around a customized webserver that responds to HTTP GET requests, handles sessions/compressions, and logs requests. You may need to install a package called netifaces using pip3 install netifaces (In case you do not want to run the server or having issues with it, there is a Wireshark dump that was captured while interacting with the customized webserver, skip these steps)
pc@mac~% pip3 install netifaces
Then copy the following into a file (E.g. server.py)
from http.server import SimpleHTTPRequestHandler
from socketserver import TCPServer
from io import BytesIO
from gzip import GzipFile
from datetime import datetime
from contextlib import suppress

with suppress(Exception):
    from netifaces import gateways, ifaddresses, AF_INET, AF_LINK
    print("The default network interface is: ",gateways()['default'][AF_INET][1])
    print("The default network interface mac address is: ",ifaddresses(gateways()['default'][AF_INET][1])[AF_LINK])

class Server(SimpleHTTPRequestHandler):
    def do_GET(self):
        compressed = False
        content = b'<HTML><h1>Hello World!</h1></HTML>'
        if len(content) > 0:
            if 'accept-encoding' in self.headers:
                if 'gzip' in self.headers['accept-encoding']:
                    bytes_ = BytesIO()
                    with GzipFile(fileobj=bytes_, mode='w', compresslevel=5) as f:
                        f.write(content)
                        f.close()
                        content = bytes_.getvalue()
                        compressed = True
        self.send_response(200)
        if compressed:
            self.send_header('content-encoding', 'gzip')
        self.send_header('content-length', len(content))
        self.end_headers()
        self.wfile.write(content)

    def log_message(self, format, *args):
        print("[{}] - {}:{} - {} {}".format(datetime.now().strftime("%m/%d/%Y %H:%M:%S"), self.client_address[0],self.client_address[1],args[0],args[1]))

TCPServer(('0.0.0.0', 80), Server).serve_forever()
Then run the file as Python script with elevated privileges, the reason why you need to elevate privileges because the customized webserver is using port 80 (Port below 1024 can be open only with elevated privileges, E.g. root)
pc@mac~% sudo python3 server.py
The default network interface is:  eth0
The default network interface mac address is:  [{'addr': 'bc:f2:b8:57:86:02'}]
You can either use a web browser or client to communicate with that server, the content URL in this case is http://127.0.0.1:80
pc@mac~%curl http://127.0.0.1:80
<HTML><h1>Hello World!</h1></HTML>
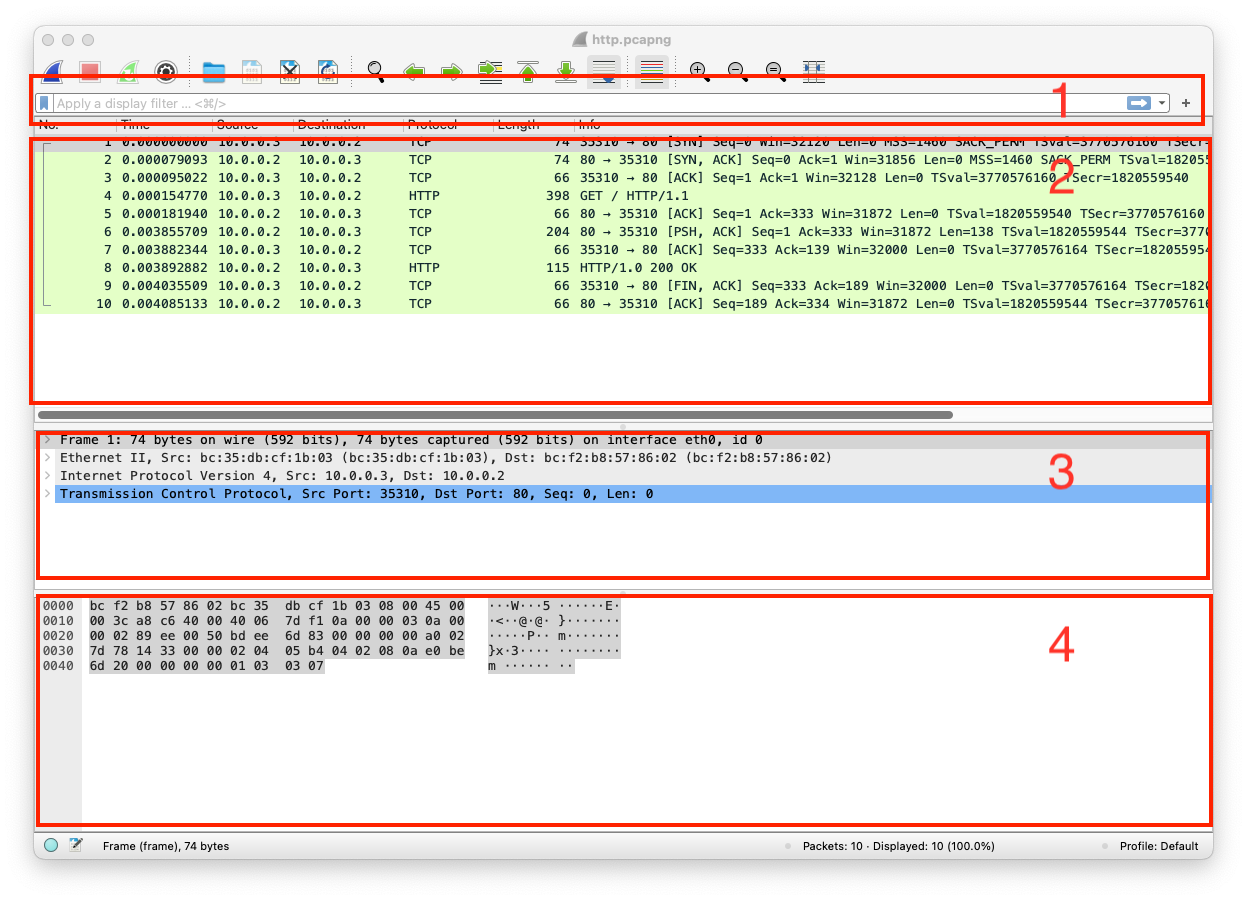
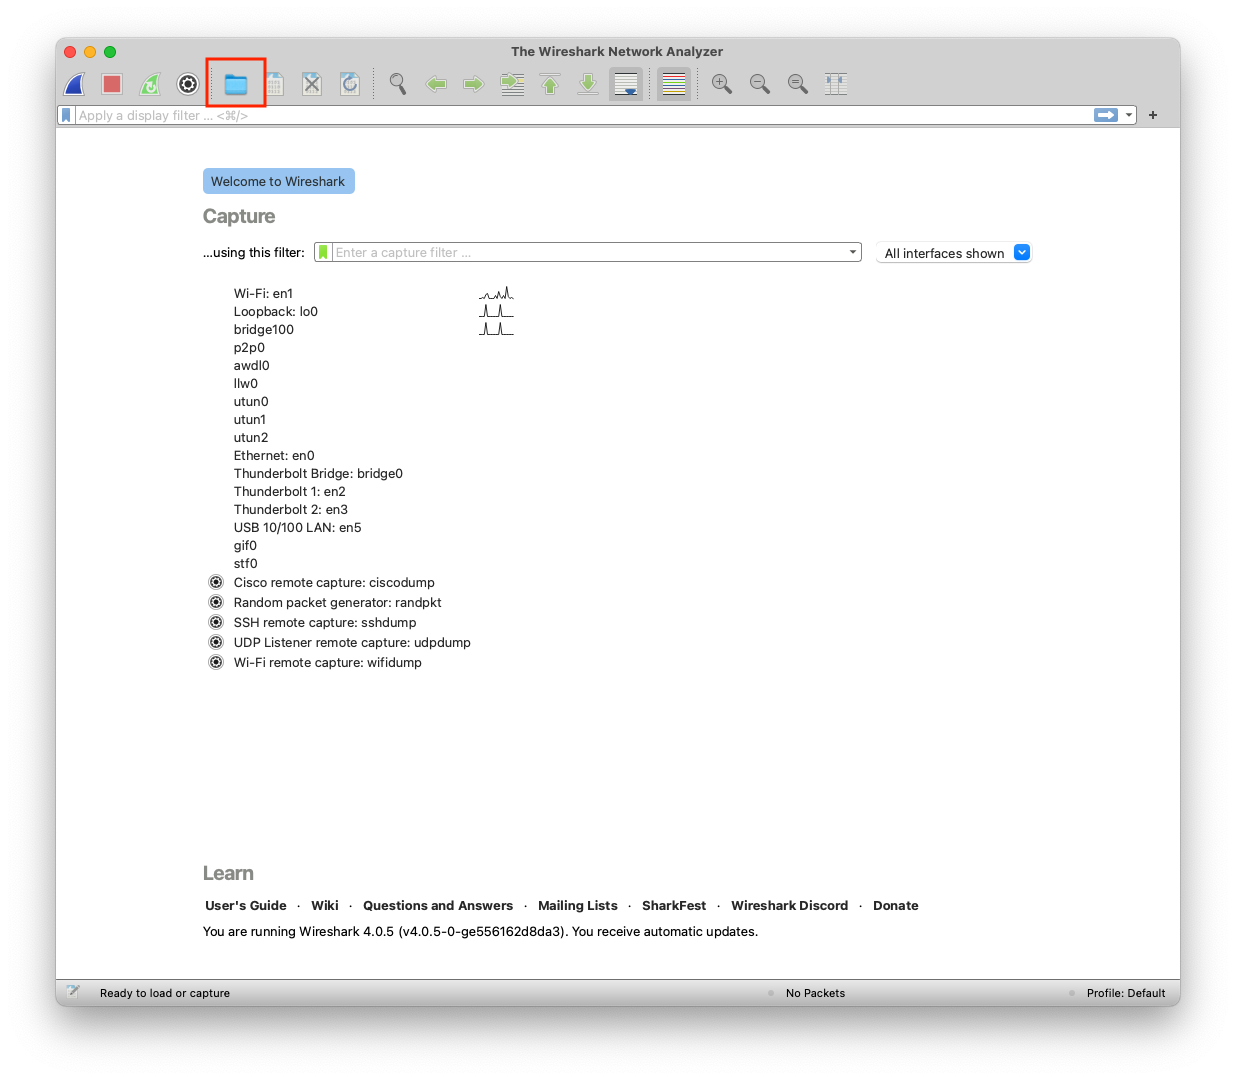
A tool or device for capturing and analyzing packets of data traveling in a communication channel. Click on open a capture file, then open the dump from the Start Here Module or this link
There are four important sections in Wireshark